|
|||||||||||||||||||||||||||||||||||||||||||||||||||||||||||||||||||||||||||||||||||||||||||||||||||||||||||
|
How Do:
Paperwork
The "How Do" articles explain certain things I do that I think others might find interesting. The section is called 'How Do' because I do not consider myself an expert in any aspect of layout construction. Much of what I do is motivated by cost savings and the desire to do my own thing. |
||||||||||||||||||||||||||||||||||||||||||||||||||||||||||||||||||||||||||||||||||||||||||||||||||||
| CAR CARDS and WAYBILLS | ||||||||||||||||||||||||||||||||||||||||||||||||||||||||||||||||||||||||||||||||||||||||||||||||||||
|
I use the very popular and commonly used car cards and waybills system for directing movements on all of my layouts (please note that is over time. I don't have the space
or the money for multiple layouts at once :) ). Like so many things, for those that understand it, car cards and waybills become second nature. It's like riding a bike,
once you know how you never forgot. But I do recall the time before 'I knew how'. So in addition to the article below on how I make my car cards and waybills, I also have a
page that describes how I use them in operation. It's from the Marien Industrial District layout, and you can
Click Here to the Operation page for that layout.
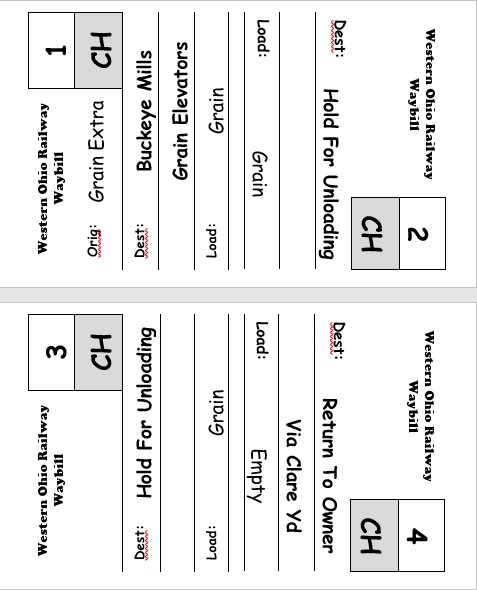
My expectations for using car cards and waybills are the following on a layout... 1. Give Layout Operations Purpose A model railroad used for simulating operation needs to feel like it has a realistic purpose. Defining 'realistic purpose' will vary between modelers. But for me, I had to eliminate as many personal decisions as possible from the process. I want the railroad responding to customer needs. Waybills represent customer needs. 2. Limit The Amount OF Paperwork Needed To Run The Layout I did not build a model railroad so I could to paperwork. My employer allows me to do all of that I want five days a week. For the Marien Industrial Distric, car cards and waybills were sufficient. I plan to start with the same approach for the Peavine Division, but may have to incorporate switch list because of the increased volume. But that is it. No other paperwork is planned. 3. Randomly Select Car Movements In operating my railroad, I don't want to sit and decide what is going to happen. I prefer to receive orders from my on-line industries. My first assignment with John Morrell and Co. had me working in their logistics office. As customer orders were filled in the meat packing plant, truck lines were called to provide trailers to ship to customers. That did, on occassion, call for a refrigeratted rail car from the UP. Waybills represent that call from a customer for a shipment, and dictate the customer needs which your model railroad is serving. 4. Manage The Duration Of Each Move Most of the car cards and waybills systems I've seen and used move freight cars from one stop to the next with every turn of the waybill. That means cars are constantly being moved with the same frequency. But in observing spotted cars in the wild (on real railroads), you will find that some are in and out in a day, while others may sit for a week. So I have incorporated a position on my waybills called 'Hold for Loading' or 'Hold for UnLoading'. So if three cars are spotted by a train on Monday, the pick up dates for those cars may be staggared across the next three operating sessions. 5. Regulate Traffic Volumes The number of cars entering the layout in each operating session should be variable. Volume of an operating session is dictated by the number of inbound cars. The number of outbound cars is dictated by the next instruction on the waybill. So on my layouts, I use the number of outbound cars from the previous operating session to set the number of waybills I pull to be inbound for the next operating session. The fact the duration of each waybill varies (#2) means the number is constantly changine. On the Marien Industrial District, the minimum number of waybills I'd pull for an operating sesson was 4 (for reference, the maximum was 8). When starting, the first operating session would have four outbound cars. Obviously no returns since the sidings were empty. So the second session would have four as well. But as cars started coming back, what ever the number of cars returning was, that would be the number of waybills I'd pull for the next session. Four or fewer returning cars would mean four waybills pulled. Five would equal five, Six would equal six and Seven would equal seven. Eight or more returning cars would hit the max of 8, so only eight waybills would be pulled. |
||||||||||||||||||||||||||||||||||||||||||||||||||||||||||||||||||||||||||||||||||||||||||||||||||||
| MAKING YOUR OWN CAR CARDS and WAYBILLS | ||||||||||||||||||||||||||||||||||||||||||||||||||||||||||||||||||||||||||||||||||||||||||||||||||||
WHAT YOU NEED 1. 4x6 Blank Index Cards 2. 3x5 Blank Index Cards 3. Word Processor (MS Word recommended, and referenced in this article) 4. Printer 5. Scissors 6. Glue Stick Step 1: Design the Waybill Using MS Word, change the following settings... - Paper Size = 3 x 5 in - Orientation = Landscape - Set Margins as small as possible Step 2: Insert A Table Create a one row, two cell table. The two cells will be the top and bottom of the waybill. ? This seems like a good time to address a question you may have, or will have soon. "Why am I creating the waybill sideways?" A:The text on the waybill must face opposite directions. When one step on the waybill is displayed, the bottom his hidden by the car card pocket. MS Word does not allow you to edit text upside down. But it does allow text from top to bottom, and bottom to top. So you rotate your text to get the desired effect. Step 3: Format The Data Elements Of The Waybill 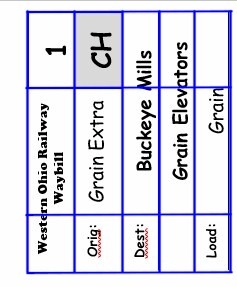 Too technical to describe exactly how to do this step by step.
You'll need to incorporate your MS Word knowledge (sorry... even if I wrote it out, it would be hard to understand). I can tell you that I
created a separate table within the original two cell table created above. The grid of the table I inserted is highlighted in the image with blue lines.
By mergning some cells to create larger text area, you can format the waybill as needed. Too technical to describe exactly how to do this step by step.
You'll need to incorporate your MS Word knowledge (sorry... even if I wrote it out, it would be hard to understand). I can tell you that I
created a separate table within the original two cell table created above. The grid of the table I inserted is highlighted in the image with blue lines.
By mergning some cells to create larger text area, you can format the waybill as needed.
The data elements I include on my waybill are... 1. Western Ohio Railway, Waybill Header - This gives the waybill the look of an official railroad document. 2. Waybill Position Number - This is the counter for what position the waybill is in. You move to the next position at the start of each operating session. 3. Origin - Only used on position one, this give the person setting up the operating session instruction where the car is coming from. This will dictate what train the car arrives from. 4. Freight Car Required - Indicates what type of freight car is required to transport the contents of the waybill. 5. Destination - This is where the car is to be delivered. This is the move instruction for the operating session. You may need/want to include blocking information, but I have not done that for the Marien Industrial District. This field is allowed two lines for large industries if you need to specific a specific drop location. 6. Load - This is actually optional. It add to the illusion you are hauling something real. But the layout can operate without this value |
||||||||||||||||||||||||||||||||||||||||||||||||||||||||||||||||||||||||||||||||||||||||||||||||||||
|
|
||||||||||||||||||||||||||||||||||||||||||||||||||||||||||||||||||||||||||||||||||||||||||||||||||
|
Quick Link Menu | Home
|
||||||||||||||||||||||||||||||||||||||||||||||||||||||||||||||||||||||||||||||||||||||||||||||||||
|
Western Ohio Story Concept History System Map Peavine Division Layout About the Peavine Layout Track Plan Guiding Principles Engine Roster Industries |
Other Layouts Marien Switching District Offal, IN Branch Influences and Inspirations Favorite Layouts How Do Paperwork |
The Real Peavine About the Peavine Prototype Industries 1987 Inspection Trip 1965 Timetable Photo and Video Galleries Prototype Gallery Peavine Gallery Walk The Line Model Gallery |
About Owner: David Lamb Contact the WO About The Site About The Home Page Favorite Resources FB-Cincinnati Eastern Railroad FB-History of the Peavine RR Cincinnati Traction History YouTube - Jaw Tooth Channel |
|||||||||||||||||||||||||||||||||||||||||||||||||||||||||||||||||||||||||||||||||||||||||||||||
| Copyright 2013 - 2025 | ||||||||||||||||||||||||||||||||||||||||||||||||||||||||||||||||||||||||||||||||||||||||||||||||||